

Lead Scoring and Generating | SharpSpring Module
To organize and manage the Contacts is the most important thing.
The MAP should give the team every move and act the Contact has made and which can lead to the next step.
What’s the one ability that impacts marketing the most? Organizing and Managing the contact - not just at the beginning but throughout the lead-lifecycle. If you are using the MAP, it should give you the capability to do just that. And more.
SharpSpring takes it to the next level with its Multi-attribution process and features from multiple types of lists to lead classification and everything in-between. Any lead can be integrated into various stages of lead-lifecycle seamlessly regardless of the time and channel to increase the marketing team’s effectiveness and success rate.
Using Contact Manager
The Contact Manager is by default always on the SharpSpring top toolbar and you can access anytime from anywhere within the application by clicking Contact -> Contact Manager
Searching Leads
You can use the Contact Manager search bar for searching leads and enhance the results using Sort By feature or create an Advanced Search for specific profile attributes and apply filters for identifying leads.
-
Sort By Feature - Sort by feature has the following features to enhance the search results for better access and usability.
-
Sort by Lead Score
-
Sort by Created
-
Sort by Last Updated
-
Sort by First Name
-
Sort by Last Name
-
-
Advanced Search Feature - Advanced search feature gives you the ability to use system fields and custom fields for business-specific targeting.
-
Creating a New Advanced Searches
-
In SharpSpring's top toolbar, go to Contacts > Contact Manager.
-
Click on the Advanced Search button.
-
Select desired filters in the Contact or Campaign section and enter necessary fields values accordingly.
-
To save this search for future use, click Save
-
Optionally, click Clear All to reset all filters.
-
Click Search.
-
-
Using System and Custom Fields for Advanced Search
-
In SharpSpring's top toolbar, go to Contacts > Contact Manager.
-
Click on the Advanced Search button.
-
Click + Add Fields option at the end of the Contact Section.
-
Choose the desired system or custom field.
-
FIll necessary options for the fields.
-
Optionally, remove a selected field, by clicking on Delete.
-
To save this search for future use, click Save
-
Optionally, click Clear All to reset all filters.
-
Click Search.
Expert Insight:
In Advanced Search, select Saved Searches or Recent Searches for quick search based on previously defined criteria. You can also set a particular search as a default search view.

Using Lists
Lists are the weapon of any marketer. Building quality email/contact lists drive the sales and generate leads for new product and service launch. From subscription lists to manual lists, you need to effectively maintain these for your marketing automation efforts.
SharpSpring offers Manual and Rule-based lists with many useful options to efficiently manage lists and utilize them according to your automation goals.
Creating Manual Lists
Manual lists allow you to manually review the status of leads (such as opt-in/subscribed/unsubscribed) and take action accordingly. To create a Manual List, do the following -
-
In SharpSpring's top toolbar, go to Contacts > Lists.
-
Click Options > New List.
-
Enter the name and select a folder from Add this list to the folder drop-down menu to add.
-
Select the checkbox Make this list available in the Contact Manager.
-
Choose the Manual list option.
-
Click Create List.
Creating Rules-Based Lists
Rules-based lists further automate the list management by dynamically removing a lead when a lead doesn’t satisfy any lead action rules. Rules-based lists come with highly configurable options for desired marketing automation. To create a Rule-based List, do the following
-
In SharpSpring's top toolbar, go to Contacts > Lists.
-
Click Options > New List.
-
Enter the name and select a folder from Add this list to the folder drop-down menu to add.
-
Choose the Rules-Based list option.
-
Click Create List.
-
Scroll down to the Triggers and Filters section.
-
Choose is explicitly opted in to receive email from the When a contact drop-down menu.
-
Check all checkboxes for opt-in reasons.
-
Click Add Rule.
-
Click Save Changes.
Useful List Features
Lists come with a number of features to make the best use of them and manage leads with up to date status. The following are some features that are of great use for marketing automation.
-
Modifying Lists - You can modify your list and it’s parameters anytime you want.
-
Splitting Lists - Create sub-lists from the original list.
-
Deactivating Lists - You can deactivate a list and later on you can either remove it permanently or restore it.
-
Duplicating Lists - You can duplicate both static and dynamic lists.
-
Reconfirming Lists - For GDPR compliances and recipient consent you can configure and automate confirmation email and add the lead to lists based on list configuration triggers.
-
List Tags - You can add tags to your lists and add lists to tags. This gives you the capability to send emails across multiple lists using tags.
-
Importing/Exporting and many more features for managing leads in static and dynamic lists with Multi-attribution process.
Lead Scoring
Do you know your lead generation ROI can be increased by 77% by just using lead scoring?
It’s true and backed by market researches. Using lead scoring enables you to spend your time efficiently on qualified leads and automating the whole process with dynamic outreach further increases the lead conversion rate.
SharpSpring’s lead scoring engine enables you to manage your leads by organizing and prioritizing them based on information, event, activity by the lead using custom lead scoring parameters. One important thing to note here is that every company has a different strategy and approach based on its audience, goals, and niche. To complement that, SharpSpring’s lead scoring tool offers extensive personalization and configuration to utilize the interactions that are unique to your organization.
SharpSpring’s lead scoring tool not only helps you segmenting and prioritizing your leads but also gives you the capability to accurately reflect the lead value with multi-attribution configurations such as activity period and decay timing.
Leads have different statuses which are as follows -
-
Open - New and unprocessed lead
-
Unqualified - Lead that does not meet any desired criteria to be a potential customer
-
Qualified - Lead that meets the desired criteria to be a potential customer
-
Contact - Not included in the sales process
-
Customer - Won opportunity
-
Opportunity - Lead associated with a new opportunity
Expert Insight:
-
You can bulk edit leads statuses from the Contact Manager
-
You can set existing list Static or Dynamic from Contacts > Lists > Change List Settings
Leads also have different attributes that can be coupled with a lead’s status for configuring the lead nurturing approach based on their interaction with your marketing content. To use the Lead Scoring feature, do the following -
-
In SharpSpring's top toolbar, click Contacts > Lead Scoring.
-
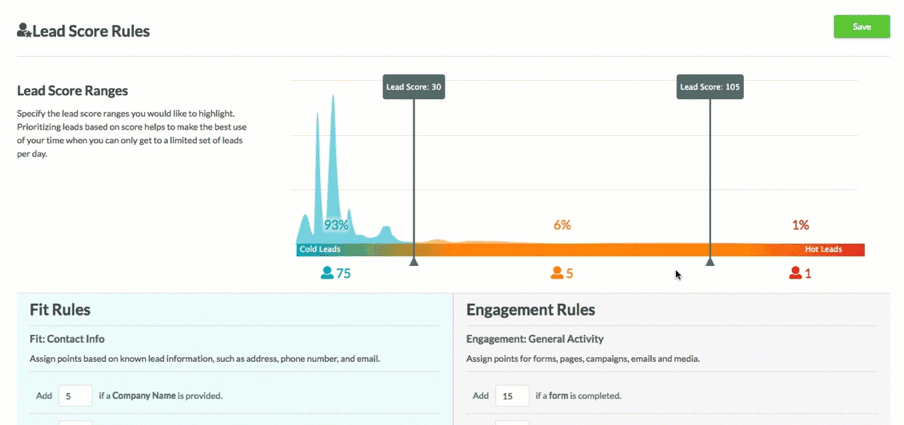
Set a desired Lead Score Range using sliders -
-
Lead Score Range feature is used to define the score for great, good, and bad leads.
-
Once you set the range using sliders, you can instantly see how many leads fall in that range.
-
-
Assign points for lead scoring in the Fit Rules section -
-
Contact Information - Assign points for contact information data such as company name, first name, last name, email, phone number etc.
-
Persona - Click + Add Rule and assign points for the persona
-
Custom Attributes - Click + Add Rule and assign points for the custom field attributes.
-
-
Assign points for lead scoring in the Engagement Rule sections -
-
Activity - Assign point for carious platform engagements/activities such as form filling, page visits, email click, media view etc.
-
Social - Click + Add Rule to add social media listener and assign points for each social media.
-
Pages - Click + Add Rule to add page links and assign points for page visits.
-
Media - Click + Add Rule and add media and assign points for media views.
-
Chatbot - Click + Add Rule to add chatbot and assign point chatbot interaction.
-
-
Specify settings in the Activity and Decay Timing section -
-
Lead Activity Period - to refine the activity period
-
Lead Score Decay & Rate of Decay - to adjust the lead score based on interaction history
-
-
Click Save and Rebuild All Lead Scores.
You can view Lead Score of a lead by clicking the Lead Score on a lead in the Contact Manager. It will show you total points for the lead with insight for each lead scoring parameter.
Utilizing Lead Scoring in Marketing Automation
SharpSpring allows you to set lead action rules for Visual workflow for nurturing leads in a smart way.
-
In SharpSpring's top toolbar, go to Automation > Visual Workflows.
-
Create a new visual workflow or edit the existing one.
-
Click + Add on an applicable workflow branch and select Trigger or Filter as needed.
-
Under Lead, select has the lead score.
-
Specify the desired lead score.
-
Select the desired condition.
-
Click OK.
SharpSpring also allows you to set lead action rules to new automation list to further manage and refine marketing automation.
-
In SharpSpring's top toolbar, go to Contacts > Lists.
-
Create a new list - either Dynamic or Static.
-
Choose the trigger or filter accordingly.
-
Select has the lead score, In the When a contact field drop-down
-
Specify the desired lead score.
-
Select the desired condition.
-
Click Add Rule.
-
Complete the list with other triggers or filters and Save Changes.
Visitor ID
Optimizing the marketing strategy and effective resource allocation is a vital part of increasing ROI of marketing campaigns. Unless you know who is visiting your website and what content they are engaging with, you are only doing no more than a guesswork for revenue optimization.
With SharpSpring’s VisitorID feature, you can track your visitors and their activities throughout their lifetime with ease for better targeting - resulting in the right marketing spends with high ROI.
If your site is being tracked by SharpSpring, VisitorID feature attempts to make use of the IP address of the visitor to pull out the information that is further coupled with known information such as static IP addresses of business and organizations to fetch accurate information.
VisitorID segment the information in two different primary sections -
-
Visitor List - When you click on VisitorID on the top toolbar, on the left side a list shows up to 1000 visits to your website. For multiple websites, you can filter the results by selecting individual website in the left column or view all visits to all your websites.
In Visitor List settings, there are helpful options to further curate your list according to your needs. These options include Download.CSV, Edit Important Pages, Edit Important Contacts, and Edit Blacklisted Items.
The Visitor List contains both tracked leads and anonymous visitors. You can apply filters to generate more insights onto your visitors. These filters are Less Than Two Days Old, More Than Two Days Old, Visited Important Pages, and Search.
-
Lead Record - Lead record contains all gathered information about a visitor/lead which can vary depending on the information provided/fetched. Typically these are Name, Email, Phone, Website, Location, etc.
Lead Record also has a Visitor Chart to show the number of visitors and the number of pages visited by them. Visitors can be converted into leads by Convert to the Lead button.
A visitor/lead also has useful metadata associated with them such as Industry, IP Address, Visited Website etc for more insight that can be utilized for lead nurturing.
Setting up VisitorID
Let’s quickly take a look at how to set up the VisitorID. For this, you need to configure Important Contacts and Important Pages parameters. Important pages are the pages on which you want to track a visitor/lead.
-
Important Contacts
-
In SharpSpring's top toolbar, go to User Settings > Settings.
-
Click VisitorID under Tracking in the left panel.
-
Click the Important Contacts tab.
-
Select checkboxes accordingly.
-
Click Save Changes.
-
-
Important Pages
-
In SharpSpring's top toolbar, go to User Settings > Settings.
-
Click VisitorID under Tracking in the left panel.
-
Click the Important Pages tab.
-
Select web pages from Site dropdown.
-
Enter extension in Page input box.
-
Select Color for distinctive identification.
-
Click + Important Page button to save.
-
VisitorID feature, by using reverse IP lookup for information, more than double the lead generation from your website. SharpSpring also allows you to configure any lead’s daily VisitorID results so that you can do better prospecting without missing any opportunity.
Social Media Listning
Social media has become such an important marketing channel that it doesn’t matter what business you are in, you have to put out your content on social media with a well-thought strategy. You can further unlock the huge opportunities for your business by integrating your social media efforts with marketing automation.
SharpSpring MAP has all the tools you need for social media - from creating posts to lead scoring baes on social interaction - without ever leaving the SharpSpring platform. These tools will help you drive traffic, bring more qualified leads, and engage your audience to build your brand with improved customer relationship and retention.
Social media capabilities provided by SharpSrping platform acts as a direct line of communication between you and your customers and can even attract a larger audience by enhancing your inbound and outbound marketing efforts.
Here is a glimpse of what you can do with SharpSpring’s social media tools -
-
Connect your social media accounts in SharpSpring
-
Post to social media - LinkedIn, Facebook, and Twitter
-
Create social listening feeds
-
Content Calendar - visualize your social media strategy
-
Interaction-based automation and lead scoring based
To link leads’ accounts to their social media activities, they must have their social media details in SharpSpring. Social media details for any leads are generated by third-party service providers associated with SharpSpring and can not be manually entered.
To connect your social media accounts, do the following -
-
In SharpSpring's top toolbar, click Settings > Social Media.
-
Click Social Media On the left menu, under Features.
-
Click Add Connection.
-
Connect any or all of the supported social media accounts.
Now, Let’s take a look at social media automation capabilities of SharpSpring -
Content Calendar
The Content Calendar is a streamlined view of all your social media posting schedule. You can manage all your posts from here very efficiently without any schedule mishap. Content Calendar also gives you the capability of creating and schedule the content directly from the calendar view with a post preview.
Access Content Calendar by going to the SharpSpring's top toolbar, and click Social > Content Calendar. To create and publish a social post in the Content Calendar, click Create > Social Post and follow the intuitive flow to attach media and schedule the post for immediate publishing or for later.
Not only social media posts, but Content Calendar also allows you to schedule and send emails to lists and New blog articles. You can edit/copy the posted content and delete scheduled content.
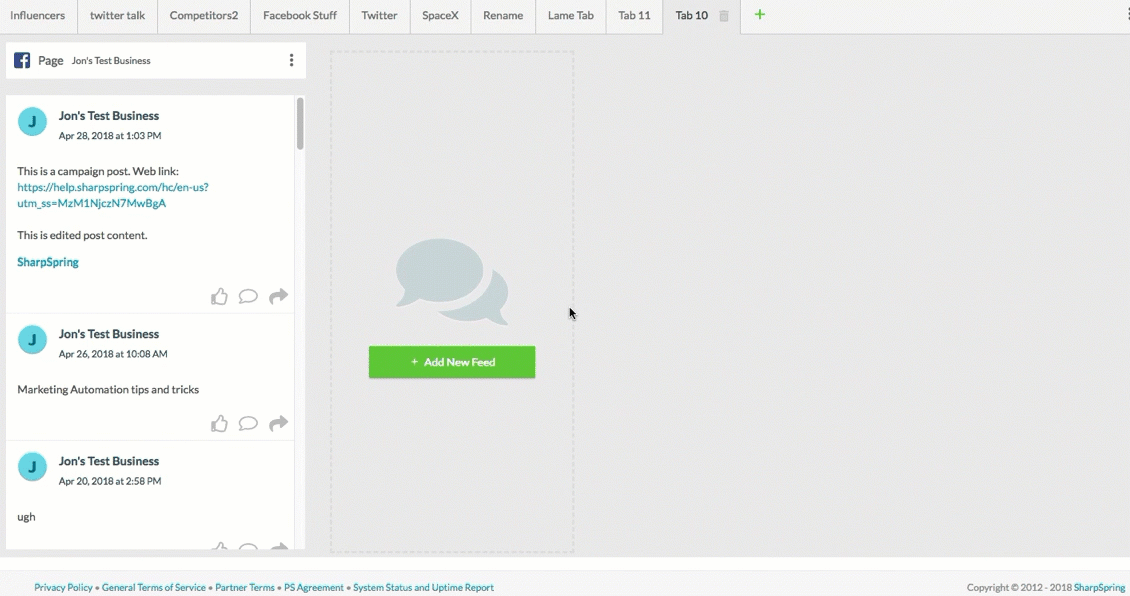
Social Listening
Social Listening allows you to monitor your social media feeds and activities. The social listening feed gets automatically updated when there is any new activity so that you have the most recent information, always. Hers is a glimpse of what you can do with Social Listening -
-
People’s opinions about your company.
-
Hashtags and buzz around your company and industry.
-
Competitors monitoring.
With this, you won’t have to log in to individual social media accounts to check what people are saying about your company or industry. You get all that information right into your SharpSpring social listening feeds.
And it’s very simple to add social listening feeds. Let’s take a look at Adding the Twitter feed-
-
On SharpSpring's top toolbar, click Social > Social Listening.
-
Click Add New Feed.
-
Click Twitter.
-
Click Next.
-
Select a Twitter profile.
-
Select a feed type.
-
Click Finish.
That’s it. After you have added it, the twitter feed will automatically be updated and you can check out all the related information and act upon it accordingly.
You can also interact with social media posts based on what interactions are available for each platform. If a post is from a lead, you will see the lead score in the post and can go directly to their profile.
What are the benefits?
-
Create, track, interact cross-channel campaigns with the same message across multiple social media.
-
Track conversions and success for campaigns.
-
Personalize and automate outreach.
-
Easily manage your content marketing.
-
Monitor your marketing strategy effectively.
-
Develop a close relationship with existing and potential customers.
Chatbot
-
56% of companies say conversational bots are driving disruption in their industry, and 43% report their competitors are already implementing the technology - Accenture
-
85% of customer support interactions will be performed by a chatbot by 2020 - Gartner
-
Chatbots will generate over $8 billion in global savings by 2022 - Juniper Research
Now that you are convinced that having a chatbot in a marketing automation platform is not just an add-on but a necessity, with SharpSpring you can unlock the unparalleled potential of chatbots - from meeting 24/7 customer support expectations to generating leads while you are off work.
SharpSpring provides a pretty simple way of creating and customizing chatbots for your website to interact with your customers and answer their questions. A truly automated communication service. They are also helpful to collect useful information about your customers so that you can later turn that information into leads and prospects accordingly.
Creating a chatbot is like creating a series of questions to complete a story to emulate one-to-one communication with a maintained flow. A typical chatbot workflow initiates with a welcome message, progresses with an initial question, provides specific answers, the user responds, collects required information, conversation ending message.
Here are simple steps to create a chatbot in SharpSpring for your website -
-
In SharpSpring's top toolbar, go to Chatbots and Click Create.
-
Input basic information about the chatbot such as name and website settings.
-
Configure a welcome message.
-
Configure questions.
-
Add output and responses.
-
Configure actions such as Schedule a meeting, send emails etc.
-
Provide end message.
-
Activate the chatbot.
That’s it. Pretty straightforward with intuitive options. Your leads will be tracked when they enter any information while interacting with the chatbot.
That was all about the Lead generation and scoring and that’s not it. SharpSpring marketing automation platform has a plethora of features to achieve your marketing and sales goals.
How THE RiCH.agency Can Help You Implement SharpSpring?
As a SharpSpring Agency Partner, we know both how to implement SharpSpring for your company and create compelling inbound marketing content to engage your leads and convert them into paying customers and for every stage on their life cycle.
Even though you can purchase the SharpSpring ( Start as low as US $485/Month) as a SaaS model from us, you can think of us as your complete partner for both marketing your products and services and providing the technical knowledge to implement, manage, evaluate, and optimize your email marketing automation program and Inbound Marketing Machine as-a-whole.
SCHEDULE A STRATEGY MEETING - IT'S FREE
A Free Consulting Meeting with RiCH team to learn your needs and work with you to choose the services you need.
A meeting can conduct at the office or Online (Webinar).
Or Call us: 800-815-1522
