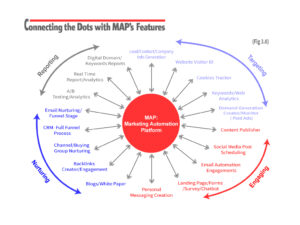

- CRM & Sales Optimizer
- SharpSpring Module
Identified Leads and customers as opportunities and place them in an Opportunity Workflow and on the CRM
How Do You Use SharpSpring’s CRM?
- From the SharpSpring toolbar, select Automation > Visual Workflows.
- Click on Create > Opportunity Workflow and type in a name for your workflow, then click OK.
- Open the Opportunities Workflow tab and click on the Activity drop-down menu.
- Select either Active or Inactive, then choose the Opportunity Workflow you wish to edit.
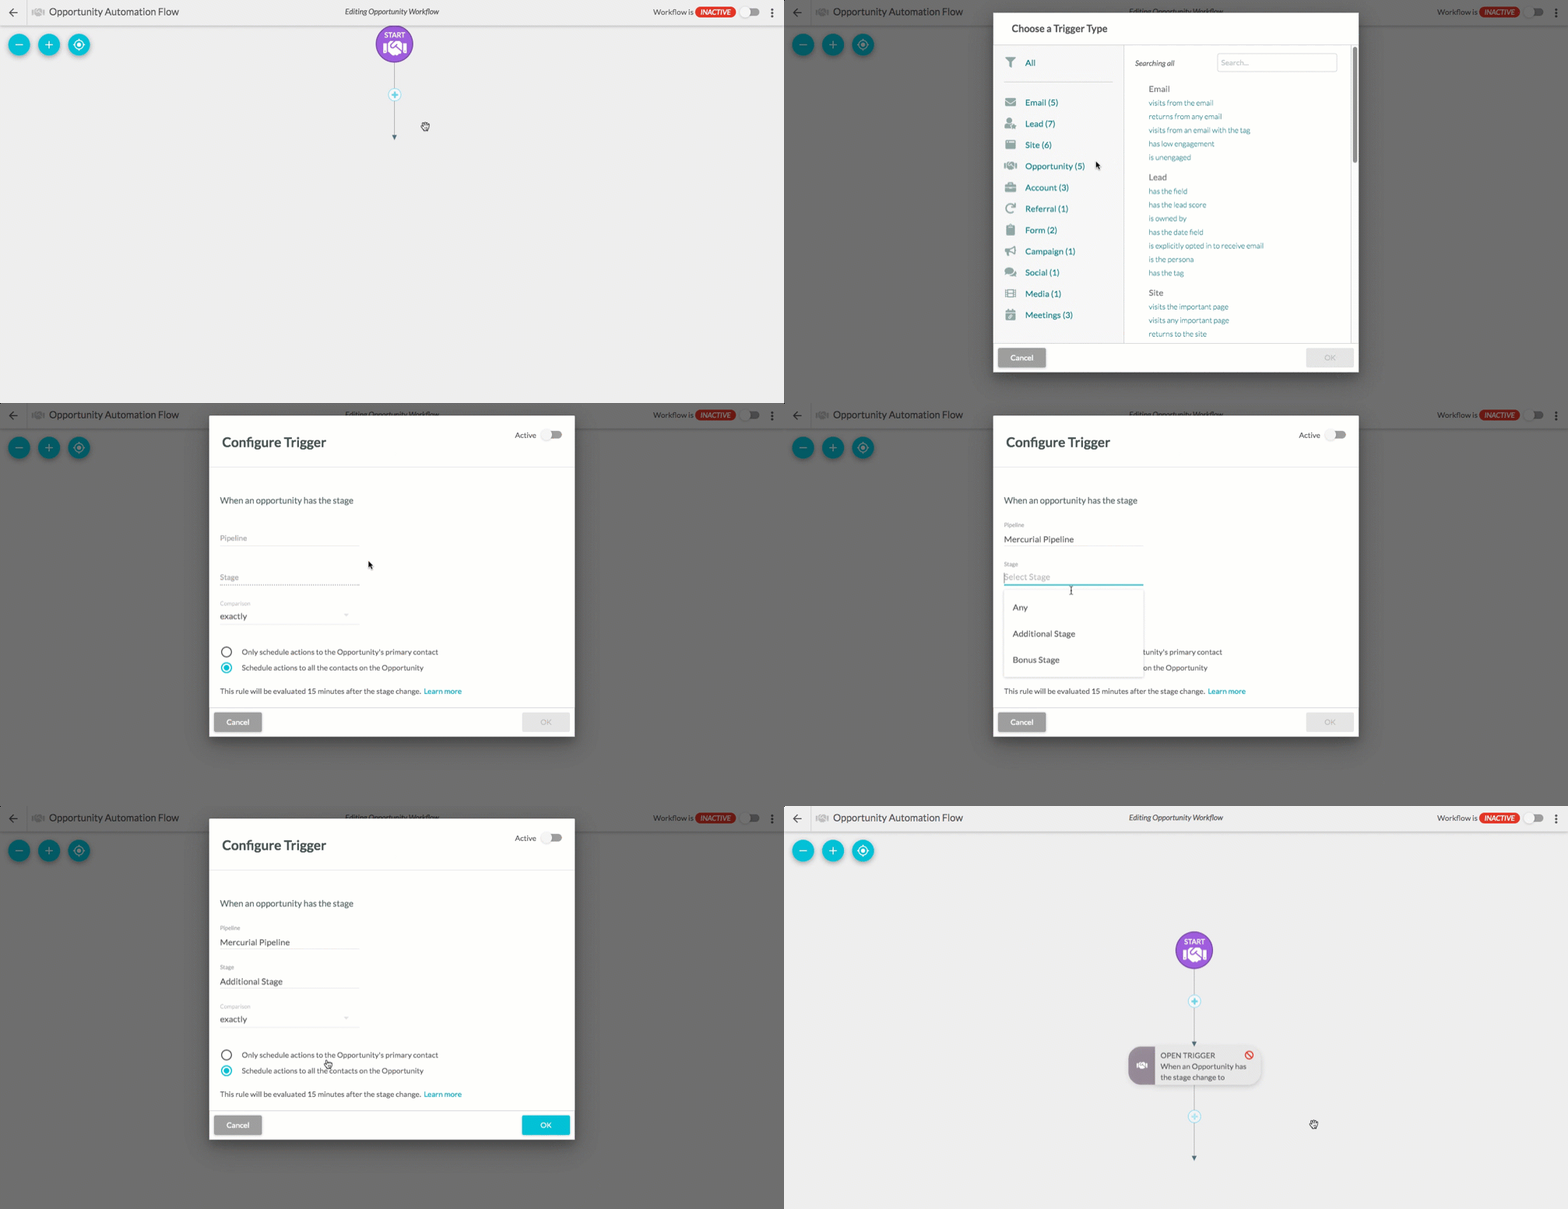
- Open your Opportunity Workflow. Then under Start or the applicable workflow branch select + Add Trigger.
- Select the desired trigger for your opportunities. Triggers can be created based on various changes made in the Sales Pipeline. An example of a trigger is when a contact reaches out to your sales team for a meeting.
- Go to + Add > Filter.
- Under the Opportunity, select the filter you want to use. Configure as needed and then click OK.
Expert Insight
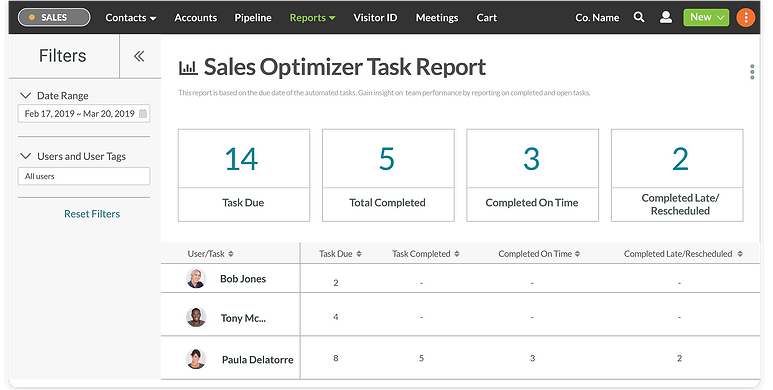
Leads needs to move between stages all the time, create workflows [Link to #1 Module) which move the leads between Pipelines, between Stages and create tasks and follow up to the sales, due to the connectivity between the Marketing to Sales and to Customer Success, and act by the Contact can create a reaction by the system for the sales or the Customer Success to engage with.
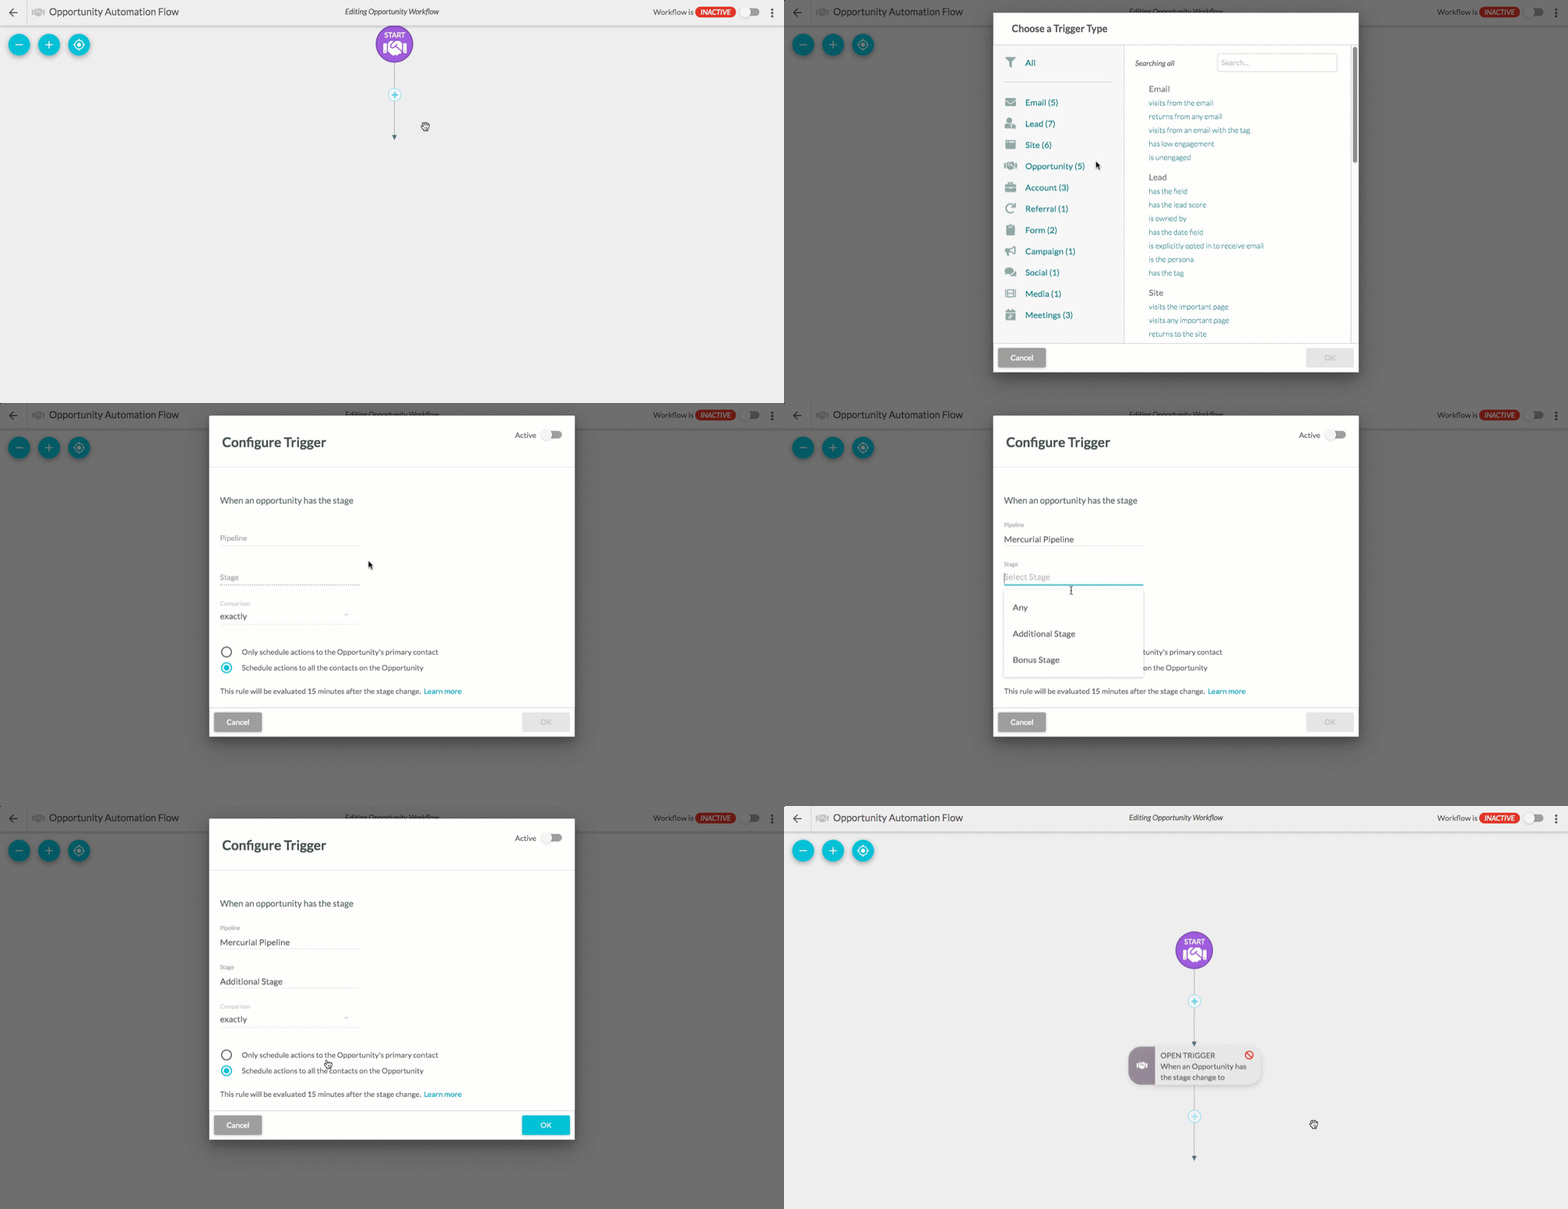
Changing Leads to Opportunities
- When you use both systems together, you unlock many extra features such as Smart Mails – one-off/scheduled emails that sales team can send from CRM and you can track them throughout the lifecycle of a lead.
- SharpSpring CRM also has a notification system that notifies you when leads return to your website.
- Utilize the Dialer, so any call you will make directly from the Marketing Automation will record as an event ion the lifecycle of the lead and even the recorded call.
- Create multiple of the pipeline, but be able to send leads when getting a pre-defined score directly to a specific pipeline, schedule a task, and even remember to the client, and everything was triggered by the Marketing events.
Expert Insight
Create a pipeline per each of your services or product, define each one of them based on the sales cycle, some of them might well have a trial before they converted to MQL and some only after the discovery meeting, this will help you to have a better forecast. See here the Sales Cycle.
Contact Manager Opportunity
- From the SharpSpring toolbar, select Automation > Visual Workflows.
- Find the desired contact and next to his name click on Setting Icon -> Options -> Create Opportunity
- In the Opportunity subsection fill in the account name, monetary worth, and expected closure date.
- In the Pipeline section select the desired pipeline, stage, and status.
- In the Attribution section, select the opportunity owner.
- In the Probability to Close section, set the probability of closure.
- In the Contacts section, select the related contacts you want to associate with the opportunity.
- There are other optional fields that you can use according to the need
- Statuses
- Tasks
- Products
- Custom fields
- Save Opportunity.
- In SharpSpring’s top toolbar, click Opportunities.
- In the Pipeline toolbar, on the right side, click + Create button.
- A popup will appear, enter the existing contact name or create a new contact for the opportunity and click Create a New Opportunity.
- Fill in the required information in the subsections (same as we described in the Contact Manager Opportunity section)
- Click Save Opportunity.
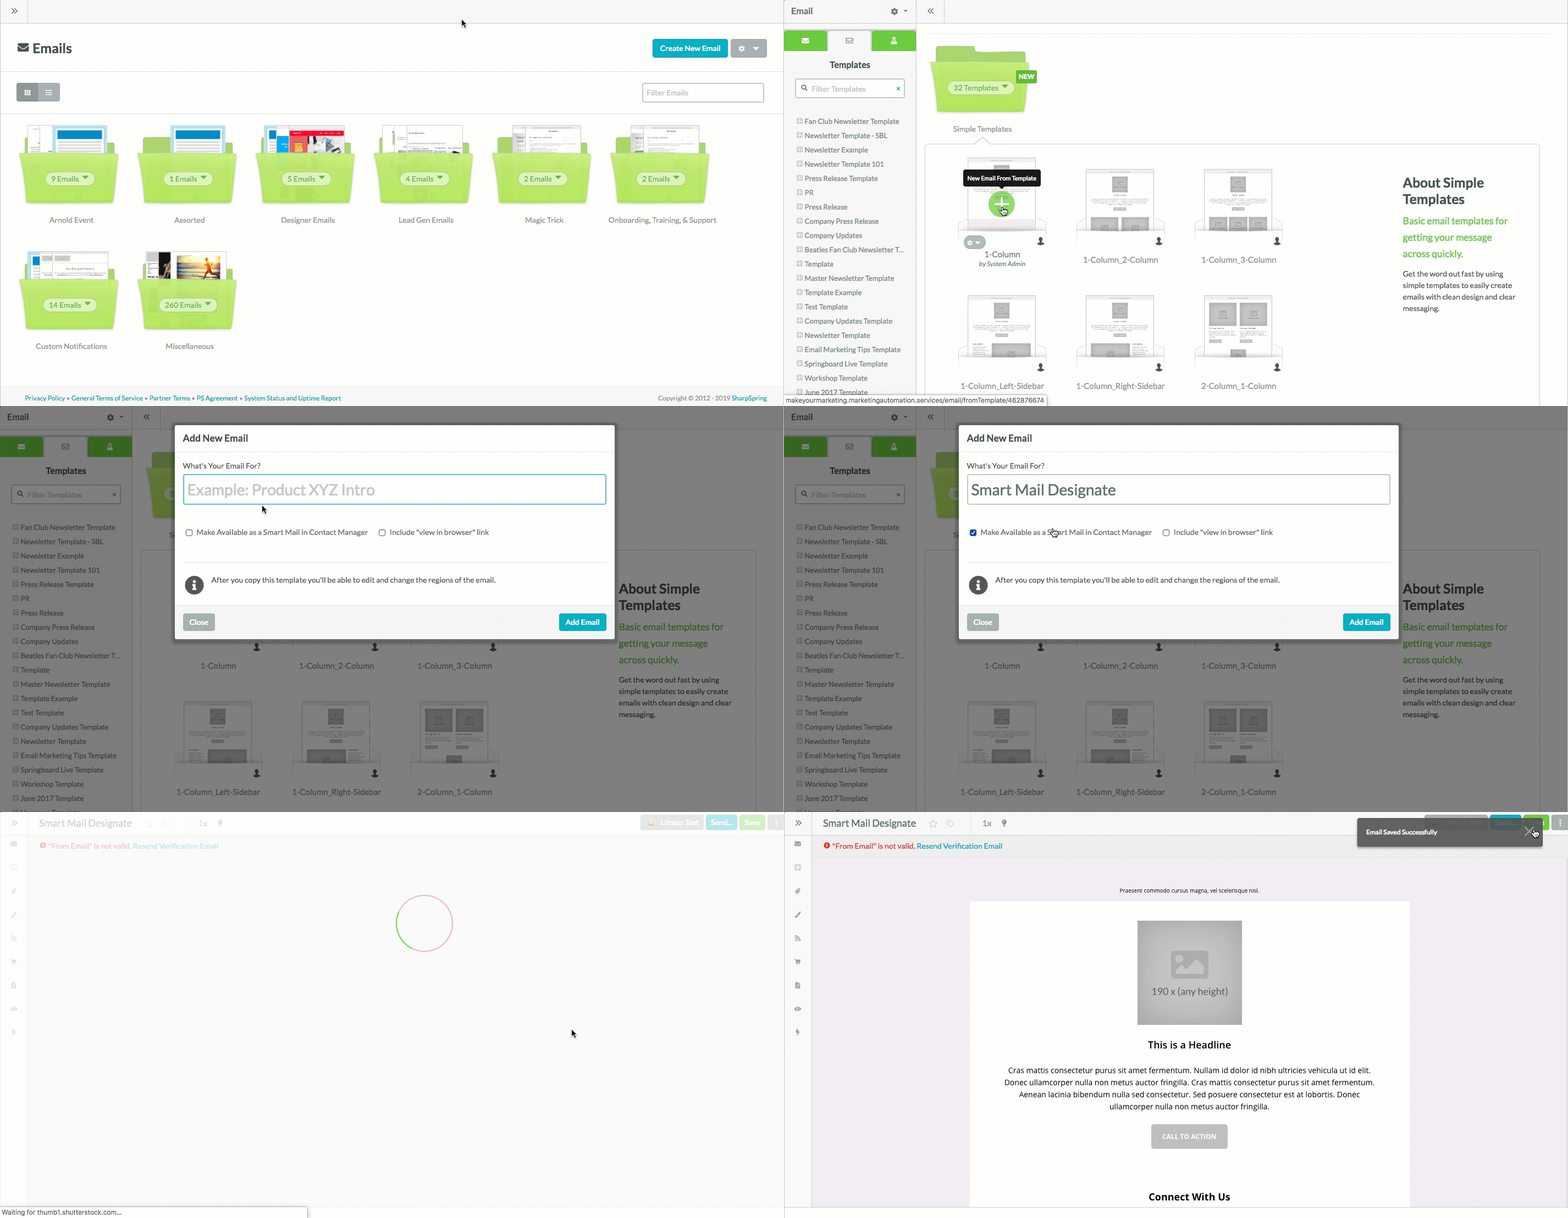
Sending Smart Mail
Sending Personalized Email from Contact Manager
- In SharpSpring’s top toolbar, go to Contacts > Contact Manager.
- Select the desired contact lead and Click Smart Mail.
- Select the desired email to send.
- Click Personalize to modify using Email Editor and attachments.
- Click Schedule Email.
- You can choose to send immediately or specify the date and time to send.
- Click Send Email.
Creating Email
- In SharpSpring’s top toolbar, go to Content > Emails.
- Click Create New Email.
- Click a template folder
- Click + New Email over the desired email from Template
- Set a name for your email.
- Select Make Available as a Smart Mail in Contact Manager checkbox.
- Click Add Email.
- Click Save.
Sending Smart Mails from Opportunities
- In SharpSpring’s top toolbar, go to Sales > Opportunities.
- Select a pipeline.
- Click on the desired opportunity./li>
- In the opportunity window, click the Contacts tab.
- Click Options > Send Smart Mail for the desired contact
- You can choose either a Quick Send or Personalized Smart Mail that we have described already.
Sending Smart Mail Quickly from Contact Manager
- In SharpSpring’s top toolbar, click Contacts > Contact Manager.
- Select the desired contact lead.
- Click Smart Mail.
- Select the desired email to send.
- Click Quick Send to send your email
That’s it. Simple, Flexible, and efficient for closing a deal with a breeze.
Ready to try it by Yourself? Register Now for the Free Trial
How THE RiCH.agency Can Help You Implement SharpSpring?
As a SharpSpring Agency Partner, we have extensive experience in creating pipelines and managing leads throughout its lifecycle to maximize the closure rate.
Even though you can purchase the SharpSpring ( Start as low as US $485/Month) as a SaaS model from us, we work as a partner with you to guide you through all the technical details, management, and analytics to make sure you get the maximum benefits of Marketing Automation and Sales CRM both individually and together for your sales team to close the deals faster.