

Marketing Funnel Module | SharpSpring Module
Email Marketing Automation is Easy with
SharpSpring and THE RICH Agency

Email marketing campaigns are one of the most cost-effective ways to acquire paying customers, increase engagement with new leads, and even reduce churn rate while increasing retention.
In fact, research from the marketing blog Optinmonster reports that companies just like yours achieve an average ROI of $44 for every $1 spent on email marketing.
These types of results are most easily achieved when you’re not just sending out email blasts to a list, but using a professional email marketing automation solution like SharpSpring, which among all the great features I will present on this page, support your company to build the focus marketing funnel to the right leads on their life cycle stage.
SharpSpring takes both the guesswork and busywork out of email marketing and helps you deliver the most targeted content to your email leads at the times they’re most likely to take actions such as fill out a form, watch a YouTube video, or convert to a paying customer.
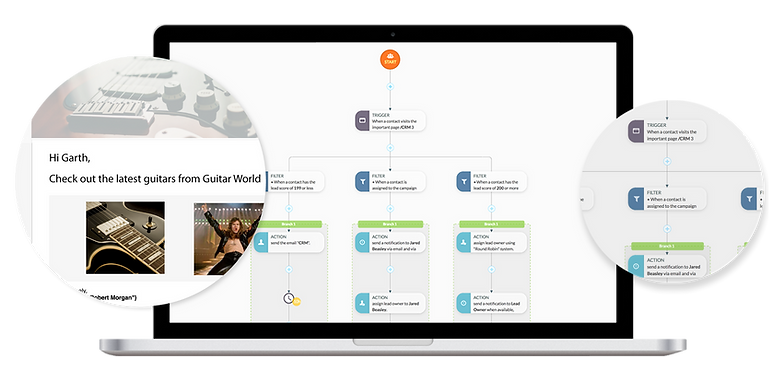
How Does SharpSpring Work?
SharpSpring is so effective at email automation because it’s an entire marketing automation platform (MAP), SharpSpring tracks all your email leads’ interactions with your company from:
- The first time your leads visit your website.
- The entire time leads are in your sales funnel considering a purchase.
- Well after your leads have purchased by emailing them relevant content to foster your relationship with them.
Because SharpSpring is with you from the very beginning and forever thereafter, the platform tracks your leads’ habits, determines exactly where they are in your sales funnel, and automatically sends them targeted email content at the exact times they’re likely to take steps towards purchasing, recommending your company to others, and more.
SharpSpring Technical Details 101
There are two key technical features in SharpSpring that enable it to send the right content to your
leads at the right time: Action Groups and Visual Workflow Automation.
What Are Action Groups?
Action Groups are a set of actions your leads complete – such as opening up an email – that trigger your desired response – such as watching a YouTube video linked in that email. You can group multiple actions together – such as opening a certain email and visiting a specific page on your website – so that you can pinpoint exactly where your leads are in your sales funnel.
How to Create an Action Group
- Select Automation from the SharpSpring toolbar, then choose Action Groups.
- Click on the New Action Group option.
- Name your Action Group, and save it to your desired Action Group folder. Alternatively, you can:
- Create a time-based Action Group that has a custom date/time field.
- Choose to make your created action available in the Contact Manager.
- Make the action repeatable so that any lead can go through this action group multiple times.
- Once you’ve made your selection, Add Action Group, then + Add > Action.
- Next, select the Actions to Use in the visual Action Group, then click OK.
- You can also add other desired options, including Actions, Filters, and Time Delays.
Inbound Marketing Expert Insight
When you build the Action Group, focus it on a specific PoT (Point of Interest), for example, any contact who has an interest in a specific feature or part of your solution, will initiate this sequence which will include only Engagement Emails type. if there are other Emails types such as Knowledge, the Contact will redirect to another Action Group, in this strategy you can be more accurate on the messages and to whom you targeting the messages.
What is Visual Workflow Automation?
You can save Action Groups in SharpSpring. Once your lead has completed your saved set of actions, SharpSpring’s Visual Workflow Automation feature kicks in. This feature is triggered by the actions your leads take – such as filling out an online form or clicking a link to go to a specific landing page – and allows you to sequence emails that you send to them with content that is relevant to where they are in your sales funnel.
How to Create, Edit, and Add Triggers to Visual Workflows
To create a blank Visual Workflow:
- From the SharpSpring toolbar, select Automation, then Visual Workflows.
- Select New Visual Workflow, then name it and click OK.
To edit an existing Visual Workflow:
- Once you’ve made your selection, Add Action Group, then + Add > Action.
- Next, select the Actions to Use in the visual Action Group, then click OK.
- You can also add other desired options, including Actions, Filters, and Time Delays.